class: center, middle, inverse, title-slide .title[ # Getting started with Git and GitHub<br /> <html><br /> <br /> <hr color='#EB811B' size=1px width=796px><br /> </html> ] .author[ ### Rockefeller University, Bioinformatics Resource Centre ] .date[ ### <a href="https://rockefelleruniversity.github.io/RU_reproducibleR/" class="uri">https://rockefelleruniversity.github.io/RU_reproducibleR/</a> ] --- ## Overview - [Set up](https://rockefelleruniversity.github.io/RU_introtoR_abridged/presentations/singlepage/introToR_Session1.html#set-up) - [Background to R](https://rockefelleruniversity.github.io/RU_introtoR_abridged/presentations/singlepage/introToR_Session1.html#background-to-r) - [Data types in R](https://rockefelleruniversity.github.io/RU_introtoR_abridged/presentations/singlepage/introToR_Session1.html#data_types_in_r) --- class: inverse, center, middle # Set Up <html><div style='float:left'></div><hr color='#EB811B' size=1px width=720px></html> --- ## Set Up All prerequisites, links to material and slides for this course can be found on github. * [Reproducible_R](https://rockefelleruniversity.github.io/Reproducible_R/) Or can be downloaded as a zip archive from here. * [Download zip](https://github.com/rockefelleruniversity/Reproducible_R/zipball/master) --- ## Course materials Once the zip file in unarchived. All presentations as HTML slides and pages, their R code and HTML practical sheets will be available in the directories underneath. * **presentations/slides/** Presentations as an HTML slide show. * **presentations/singlepage/** Presentations as an HTML single page. * **presentations/r_code/** code in presentations. * **exercises/** Practicals as HTML pages. * **answers/** Practicals with answers as HTML pages and R code solutions. --- ## Set the Working directory Before running any of the code in the practicals or slides we need to set the working directory to the folder we unarchived. You may navigate to the unarchived Reproducible_R folder in the Rstudio menu. **Session -> Set Working Directory -> Choose Directory** or in the console. ``` r setwd("/PathToMyDownload/Reproducible_R-master/r_course") # e.g. setwd('~/Downloads/Reproducible_R-master/r_course') ``` --- class: inverse, center, middle # What is Git? <html><div style='float:left'></div><hr color='#EB811B' size=1px width=720px></html> --- ## The problem As you collect code for a project, you are always making updates. What version did you use when? How do organize all of these? How do I stay in lockstep with my collaborators? How do I efficiently share code with collaborators? --- ## What is Git? * Decentralized (Whole team has a copy) * Collaborative (Whole team can make modifications) * Version control (Snapshots over time filed into organized historical manager) --- ## The principles In 2005 Linus Torvalds [the main developer of Linux] was having issues with the version control system they used. So they designed a new one from the ground up with specific set of principles: - Speed - Simplicity - Support for branched development - Decentralized - Capable of handling large projects i.e. Linux development --- ## What will we cover 1. How to set up your own repositories. 2. How to keep them updated locally and remotely. 3. Workflows for code development. 4. Workflows for collaborating with others. * Git version control system and Github as our repository hosting service * Using Git on the command line and with GUIs --- ## What will we not cover * Making packages. * Alternative systems. * Other version control systems i.e. CVS and SVS. * Other repository hosting services i.e. Bitbucket or GitLab. --- class: inverse, center, middle # Getting started with Git <html><div style='float:left'></div><hr color='#EB811B' size=1px width=720px></html> --- ## Git install You may already have Git installed, as it installed by certain tools i.e. Xcode Command Line Tools. To interact with Git at the most basic level we will use a command prompt. We can run the this command to check. ``` sh git --version ``` ``` ## git version 2.26.2 ``` If you do not have it, instructions for installation on each system is here: https://git-scm.com/book/en/v2/Getting-Started-Installing-Git --- ## Set up a local repository: *init* We initialize repositories to store files related to a project. You can make many repositories and they are just a regular folder with some extra properties created by git. ``` ## Initialized empty Git repository in /__w/RU_reproducibleR/RU_reproducibleR/extdata/.git/ ``` ``` sh mkdir My_Project_Folder cd My_Project_Folder git init ``` --- ## What is different about a repository? .pull-left[ *Mac/Linux* ``` sh ls . ``` ``` ## Descriptions ## Test.csv ## _course.yml ## customCSS ## data ## imgs ## presRaw ## scripts ``` ``` sh ls -a . ``` ``` ## . ## .. ## .git ## Descriptions ## Test.csv ## _course.yml ## customCSS ## data ## imgs ## presRaw ## scripts ``` ] .pull-right[ *Windows* ``` sh dir . ``` ``` sh dir . /ah ``` ] The .git folder is a hidden folder. This is where all the business of Git happens. --- ## What's inside .git? You can explore it. It is full of simple plain text files. .pull-left[ *Mac/Linux* ``` sh ls -a .git ``` ``` ## . ## .. ## HEAD ## branches ## config ## description ## hooks ## info ## objects ## refs ``` ] .pull-right[ *Windows* ``` sh dir /ah .git ``` ] --- ## Setting up Git to be yours: *config* When first working with git, you need to attach your information. This means you are attached to changes you make. And this will be important for connecting to GitHub later. ``` sh git config --global user.name 'BRC-RU' ``` ``` sh git config --global user.name ``` ``` ## BRC-RU ``` ``` sh git config --global user.email 'brc@rockefeller.edu' ``` ``` sh git config --global user.email ``` ``` ## brc@rockefeller.edu ``` --- ## Lets use the repository I have added a new file called README. We can check the *status* of our git once we have added this. ``` sh touch README.md git status . ``` ``` ## On branch master ## ## No commits yet ## ## Untracked files: ## (use "git add <file>..." to include in what will be committed) ## Descriptions/ ## README.md ## Test.csv ## _course.yml ## customCSS/ ## data/ ## imgs/ ## presRaw/ ## scripts/ ## ## nothing added to commit but untracked files present (use "git add" to track) ``` --- ## The 3 states of Git 1. **Working directory**: Make and save changes to files and git will be aware, but not necessarily involved. New files would be considered *untracked*. 2. **Staging**: Untracked changes or files can be *added to the staged area*. Staged files are not added to your Git repository. 3. **Local Repository**: Once all the edits are finished and the files are staged, they can then be *committed*. Commits will put the changes in the staged file into their repository. --- ## This seems overcomplicated There is a culture to making edits: * Do **not** commit every time anything is new. * Each commit should be a nice neat little story: * *Example*: If you include new function in a pipeline. Save locally while developing. Update README. Stage both. Commit it together. * The aim is you/others will look back and understand what you were thinking and doing. * **A good rule:** There shouldn't be multiple clauses in your commit message. This will mean you are likely doing multiple things. It is all about balance between having a good log of your changes, without having every single thing you do logged. Ideally each step is deliberate and thoughtful. When you are looking back through changes you want the commit of interest to be easy to find, coherent and succinct. Your future self will thank you. --- ## Staging - git add Add the README file to your staged area ``` sh git add README.md git status . ``` ``` ## On branch master ## ## No commits yet ## ## Changes to be committed: ## (use "git rm --cached <file>..." to unstage) ## new file: README.md ## ## Untracked files: ## (use "git add <file>..." to include in what will be committed) ## Descriptions/ ## Test.csv ## _course.yml ## customCSS/ ## data/ ## imgs/ ## presRaw/ ## scripts/ ``` --- ## Commiting - git commit Commit the README file into your repository with a message. If you do not add a message, you will get prompted. ``` sh git commit -m'Made a README' git status . ``` ``` ## [master (root-commit) 91c2a69] Made a README ## 1 file changed, 0 insertions(+), 0 deletions(-) ## create mode 100644 README.md ## On branch master ## Untracked files: ## (use "git add <file>..." to include in what will be committed) ## Descriptions/ ## Test.csv ## _course.yml ## customCSS/ ## data/ ## imgs/ ## presRaw/ ## scripts/ ## ## nothing added to commit but untracked files present (use "git add" to track) ``` --- ## What's changed? - git diff (pt1) You might have 3 different versions i.e. committed, staged, and working directory version. Diff can tell you the changes between these files. ``` sh echo 'Hello Friends' >> README.md git status . git diff ``` ``` ## On branch master ## Changes not staged for commit: ## (use "git add <file>..." to update what will be committed) ## (use "git restore <file>..." to discard changes in working directory) ## modified: README.md ## ## Untracked files: ## (use "git add <file>..." to include in what will be committed) ## Descriptions/ ## Test.csv ## _course.yml ## customCSS/ ## data/ ## imgs/ ## presRaw/ ## scripts/ ## ## no changes added to commit (use "git add" and/or "git commit -a") ## diff --git a/README.md b/README.md ## index e69de29..ba06163 100644 ## --- a/README.md ## +++ b/README.md ## @@ -0,0 +1 @@ ## +Hello Friends ``` --- ## What's changed? - git diff (pt2) Always good to check what is changed in your staged files before you commit. ``` sh git add README.md git status . ``` ``` ## On branch master ## Changes to be committed: ## (use "git restore --staged <file>..." to unstage) ## modified: README.md ## ## Untracked files: ## (use "git add <file>..." to include in what will be committed) ## Descriptions/ ## Test.csv ## _course.yml ## customCSS/ ## data/ ## imgs/ ## presRaw/ ## scripts/ ``` ``` sh git diff ``` --- ## What's changed? - git diff (pt2) Always good to check what is changed in your staged files before you commit. ``` sh git diff --staged git commit -m 'Added welcome message' ``` ``` ## diff --git a/README.md b/README.md ## index e69de29..ba06163 100644 ## --- a/README.md ## +++ b/README.md ## @@ -0,0 +1 @@ ## +Hello Friends ## [master 55d50ac] Added welcome message ## 1 file changed, 1 insertion(+) ``` --- ## What've we done? - git log (pt1) * Log gives a list of commits in chronological order. * There is a hexadecimal code that is unique ID for each commit. * Other information i.e. Time and Author ``` sh git log ``` ``` ## commit 55d50acda0a706492fea8db771e7c0eeefb190f3 ## Author: BRC-RU <brc@rockefeller.edu> ## Date: Wed Mar 12 14:18:47 2025 +0000 ## ## Added welcome message ## ## commit 91c2a69870c3ea659f6242f3819273c7247dfcc1 ## Author: BRC-RU <brc@rockefeller.edu> ## Date: Wed Mar 12 14:18:47 2025 +0000 ## ## Made a README ``` --- ## What've we done? - git log (pt2) Can modify the log response to specific information that you need. This is important if you want to comb through 100s of commits. * --oneline = Just commit message * --stat = What files change * --patch = What content changes ``` sh git log --oneline ``` ``` ## 55d50ac Added welcome message ## 91c2a69 Made a README ``` ``` sh git log --oneline --stat ``` ``` ## 55d50ac Added welcome message ## README.md | 1 + ## 1 file changed, 1 insertion(+) ## 91c2a69 Made a README ## README.md | 0 ## 1 file changed, 0 insertions(+), 0 deletions(-) ``` --- class: inverse, center, middle # Connecting Git to GitHub <html><div style='float:left'></div><hr color='#EB811B' size=1px width=720px></html> --- ## GitHub * While Git is local, GitHub is online. It is a repository hosting service. * Easy to back up and share code. * Easy collaboration. * Can make repositories public, so the code supporting a project will be available to others. --- ## GitHub vs. other services * Direct web access, many require desktop tools to be able to access. * Issue and pull request methodology. * GitHub probably has the most extensive features and support (i.e. transfer to svn, automated systems). * Support rendering of several file formats i.e. Markdown or GeoJSON. * GitHub community (almost like a social network). **Drawbacks** GitHub almost has a monopoly. Which can lead to [problems](https://github.com/1995parham/github-do-not-ban-us). --- ## Connecting to GitHub Everything about Git is local and offline, until you tell it to go to a remote. Push it up to wherever you're hosting you code i.e. GitHub. * Next step sign into [GitHub](https://github.com/) --- ## Create a remote repository  --- ## Get remote address The address is shown when you first set up the repo  --- ## Get remote address If you want to get the address later you can check press the clone button when you open up the repository.  --- ## Adding a remote to your local Git Add the address to the Git. If you do not want it online on GitHub you can pick somewhere else. A server or someone else laptop. ``` sh git remote add origin https://github.com/BRC-RU/My_GitHub_Project.git ``` --- ## Updating GitHub - Push ``` sh git push -u origin master ``` After pushing, your commits will appear on GitHub  --- ## Editing on GitHub Broadly you will want to do edits through Git as its has more capabilities. You can make commits on GitHub to single files i.e. if you have a typo, this can be a quick fix.  --- ## Editing on GitHub 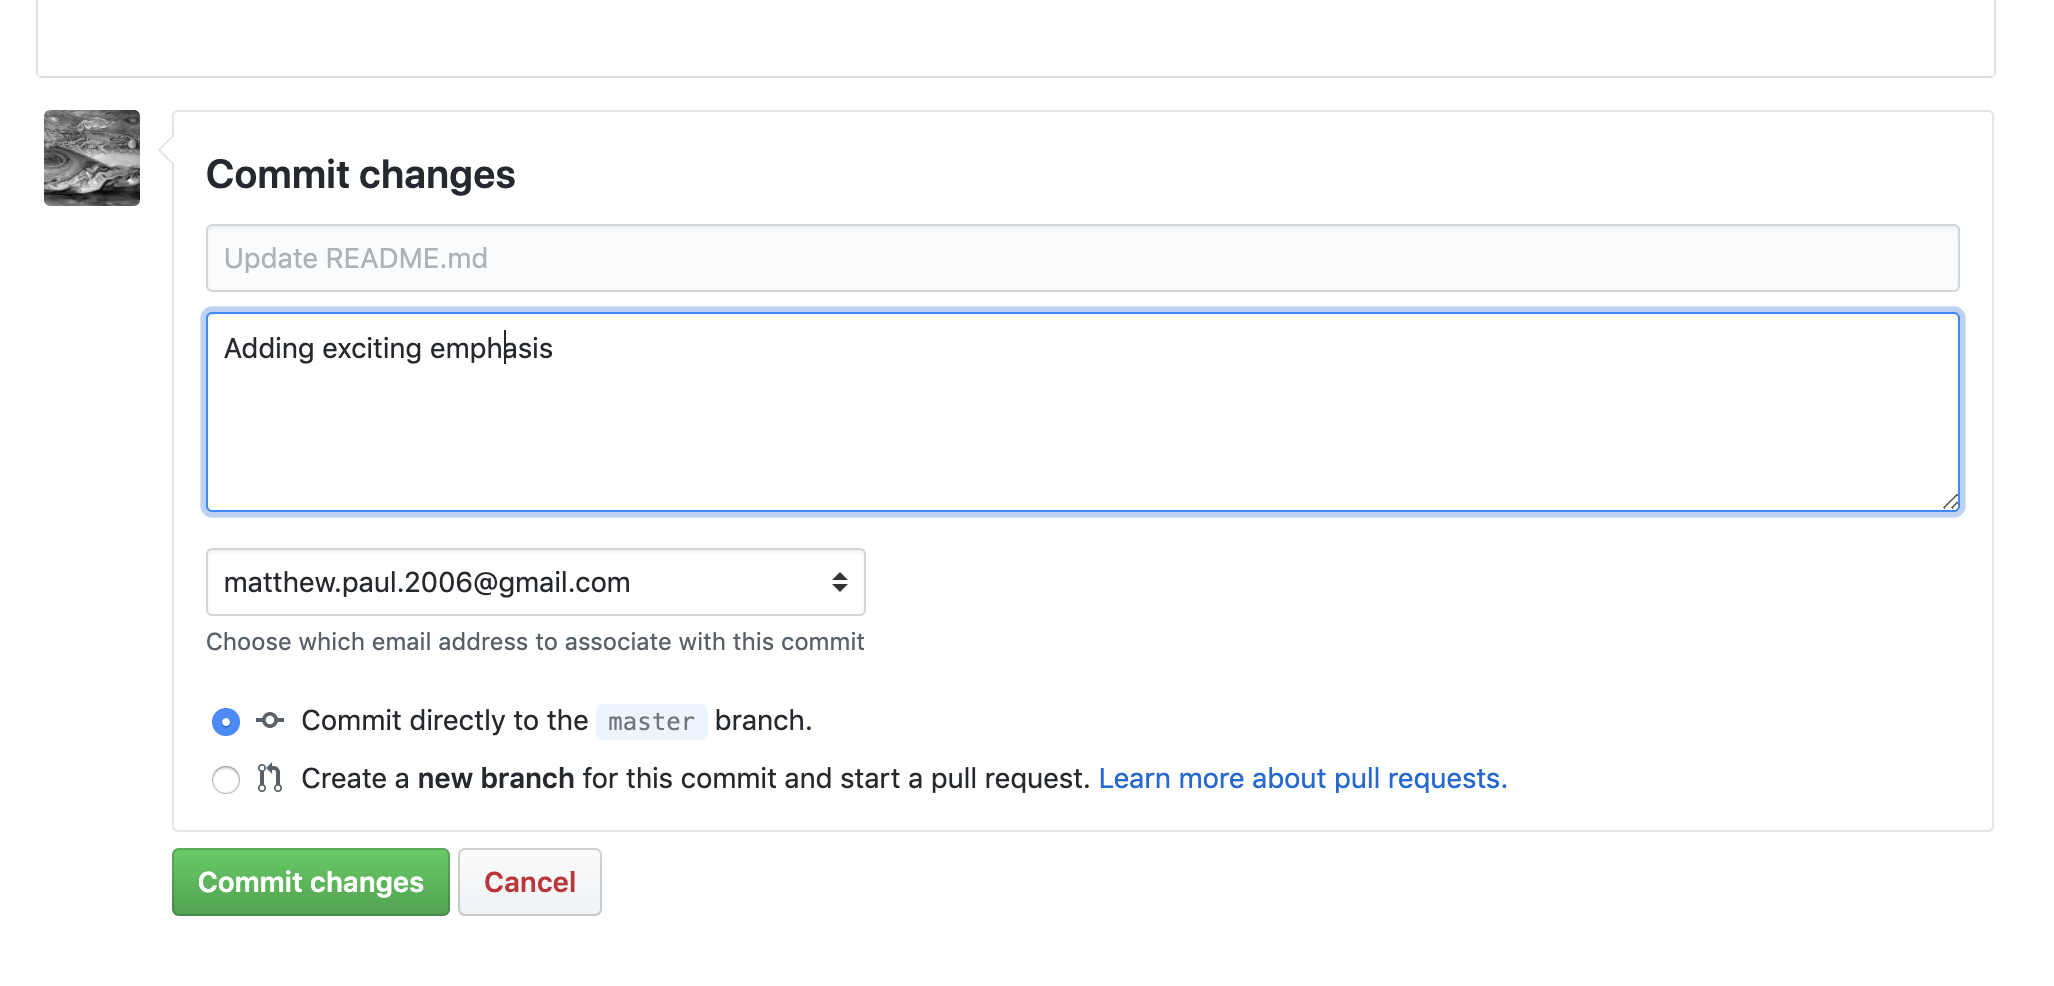 --- ## Editing on GitHub 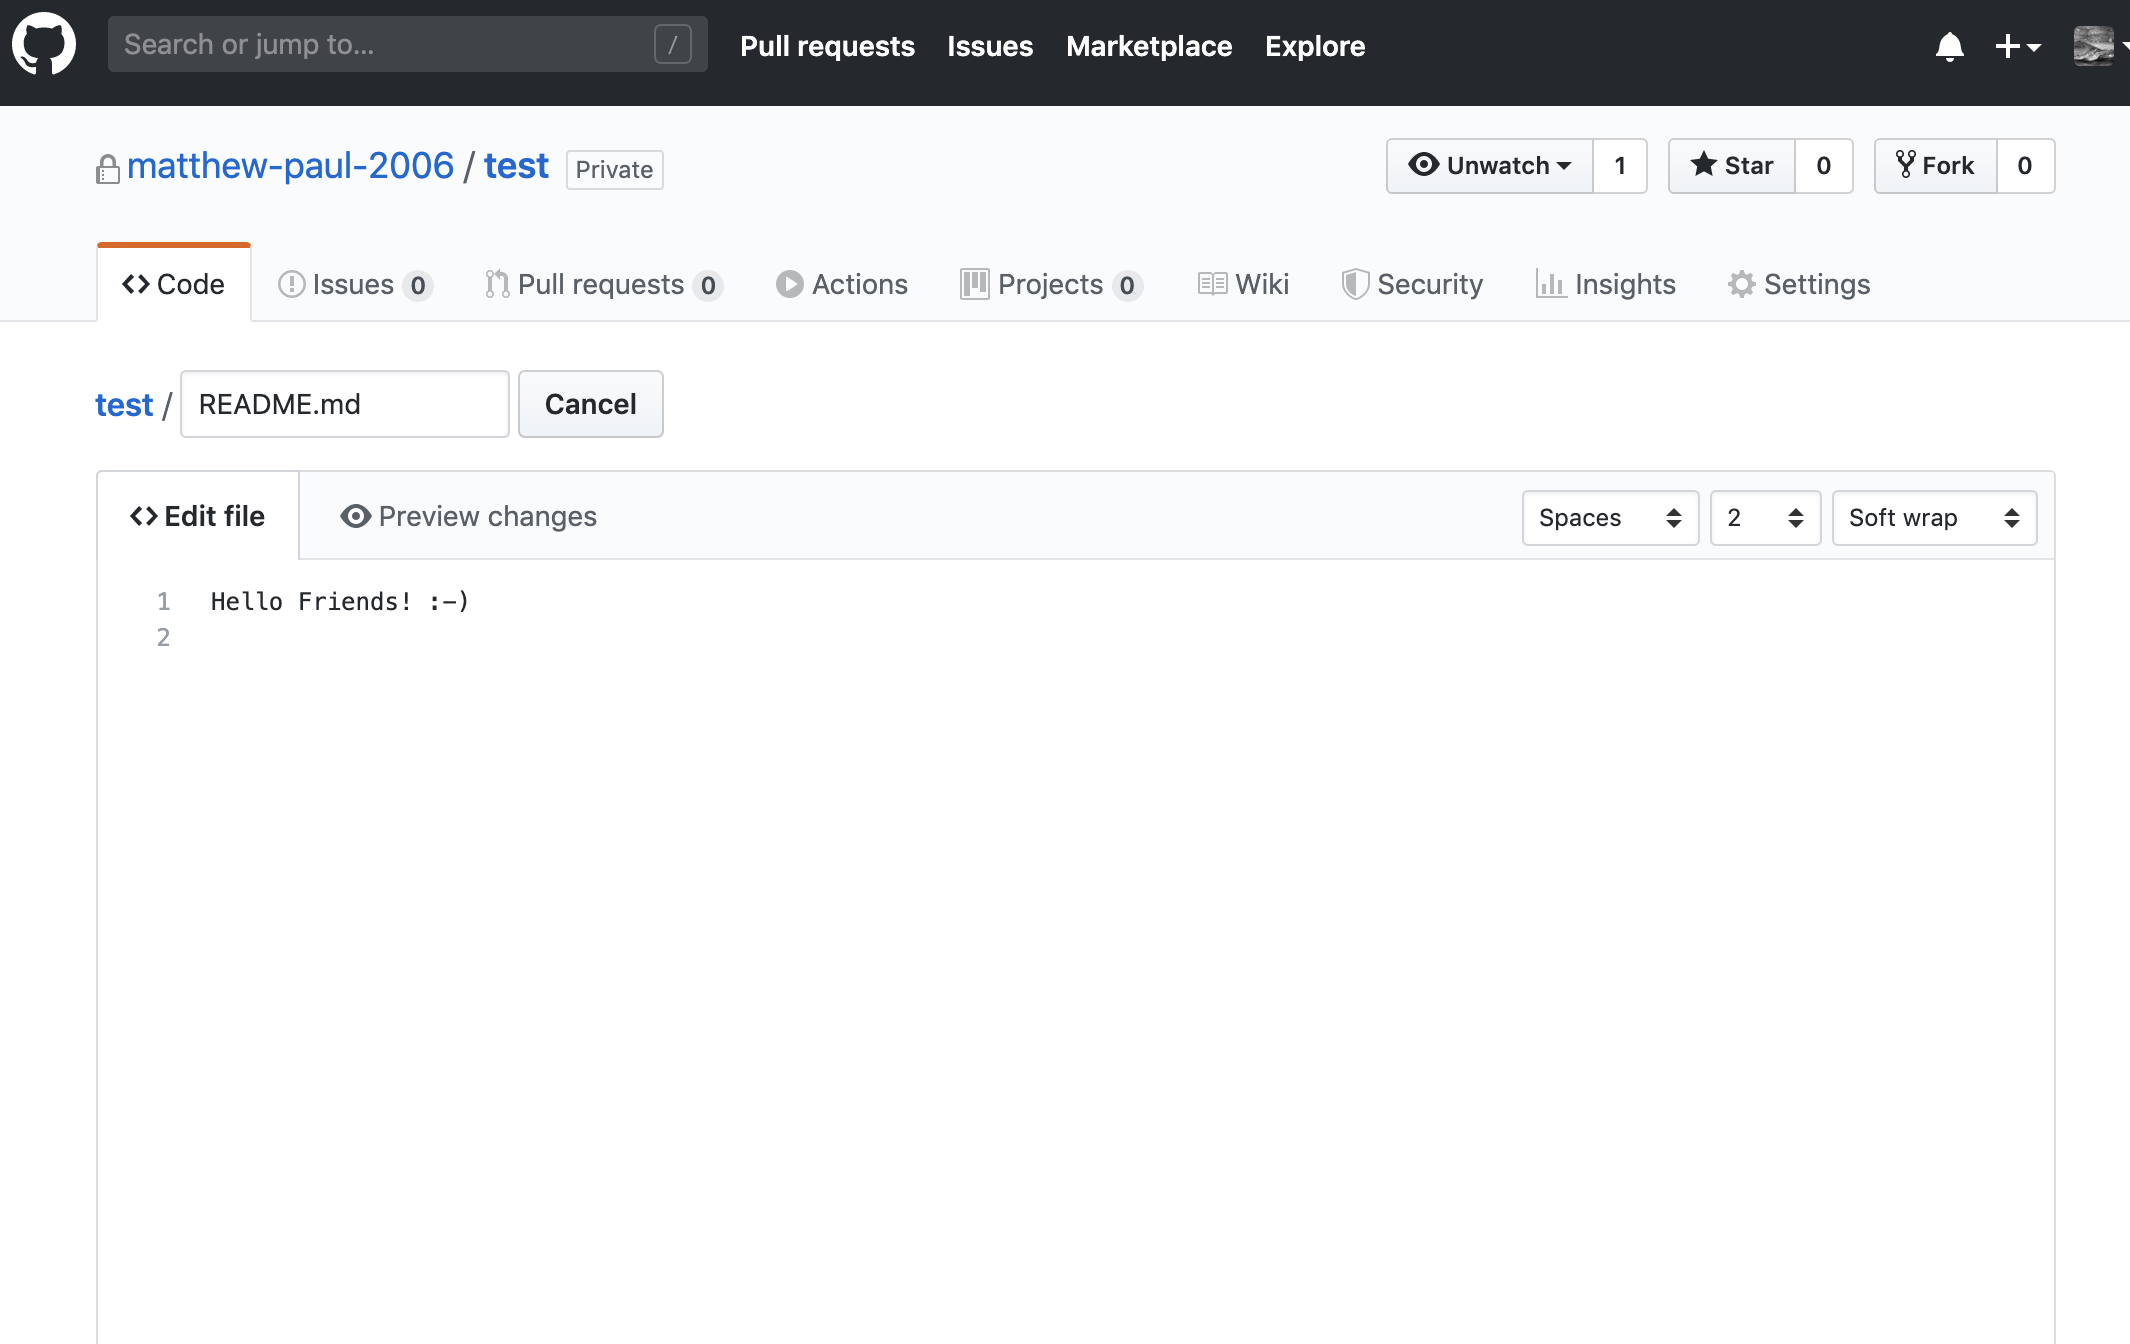 --- ## Updating your local Git - Pull Whenever your local Git is behind the remote GitHub, you can grab the updates with Pull. ``` sh git pull -u origin master ``` --- class: inverse, center, middle # Git and GUIs <html><div style='float:left'></div><hr color='#EB811B' size=1px width=720px></html> --- ## GUIs and RStudio * [GitHub](https://desktop.github.com/) has a desktop Graphical User Interface * [RStudio](https://rstudio.com/products/rstudio/download/) also has Git integration These two tools, of many, that make it easier to manage Git repositories on your computer without having to use the command line. They work by accessing the same git repository as used by the command line Git tools. This means it has the same principles. It just adds a point-and-click interface, which is easier to work with for your day-to-day Git wants and needs. --- ## RStudio RStudio has Git integration through its project management system. Simply start a project and click the version control option. .pull-left[ 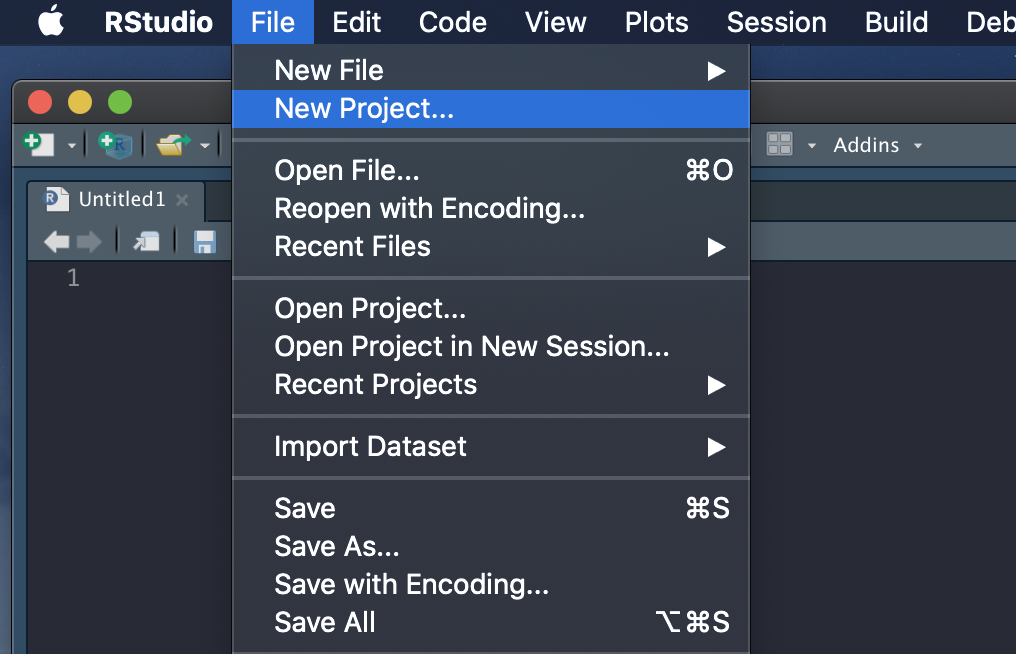 ] .pull-right[ 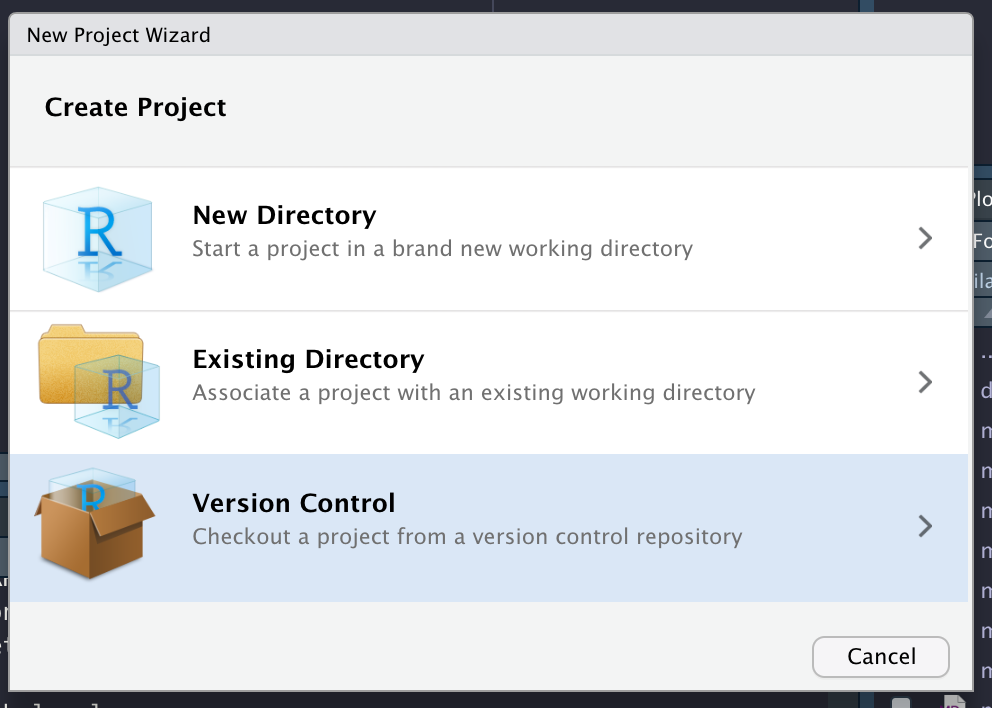 ] --- ## RStudio We can then just pick the Git option and enter the repository information. This is the same information we used when we added a remote on the command line. .pull-left[  ] .pull-right[  ] --- ## RStudio We can then just pick the Git option and enter the repository information. This is the same information we used when we added a remote on the command line. .pull-left[  ] .pull-right[  ] --- ## RStudio Once you have a new project set up this way there will be a new Git tab in the Environment pane (top right in the standard layout). .pull-left[  ] .pull-right[ 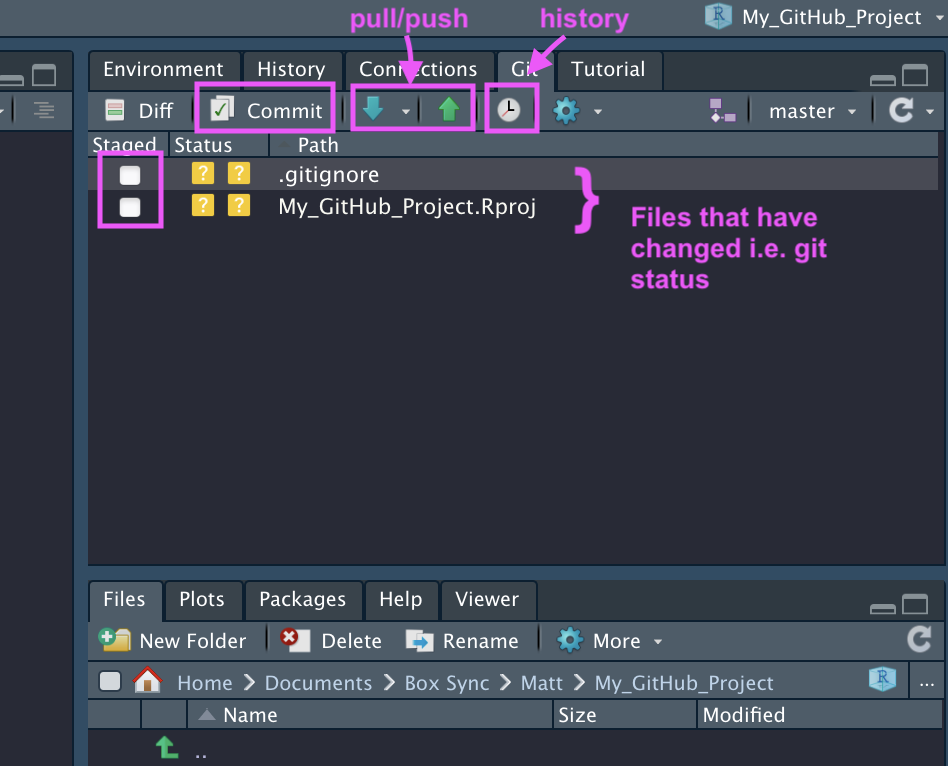 ] --- ## RStudio Commits are similar to GitHub Desktop. You can use the checkbox to stage them. Add a commit message. Then press commit.  --- class: inverse, center, middle # Project workflow and collaboration using GitHub <html><div style='float:left'></div><hr color='#EB811B' size=1px width=720px></html> --- ## Collaborating with GitHub Best practice workflow for collaborating with GitHub (or working solo) 1. Issue raised 2. Create a branch to address issue 3. Add commits 4. Pull request 5. Review changes and get feedback 6. Merge changes --- ## Raising an issue This can be done by you, a collaborator, or if the repository is public, anyone! The workflow can used to reveal a bug. An idea for a feature. Or just simple typos in your documentation. .pull-left[ 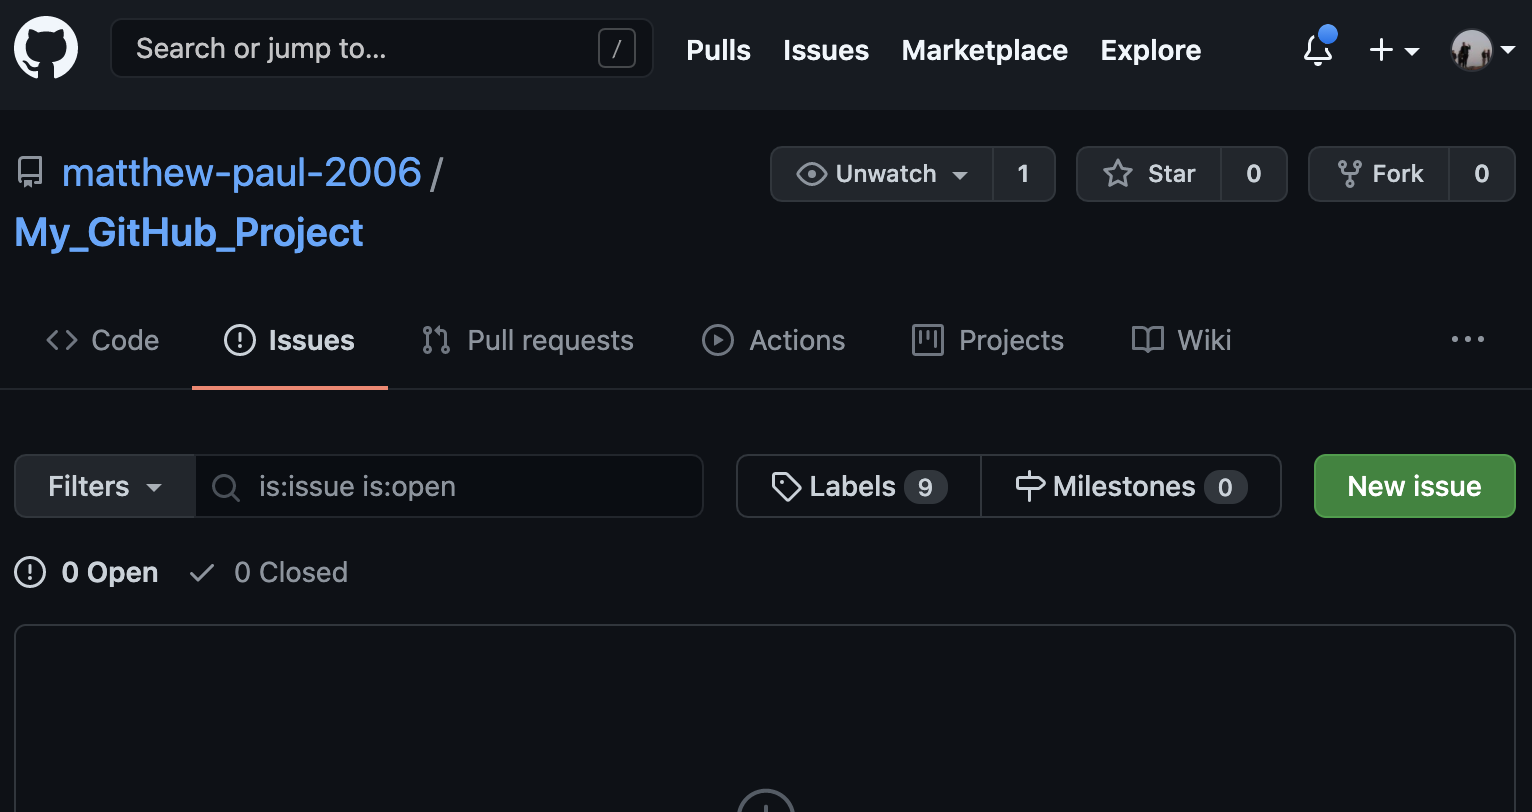 ] .pull-right[ 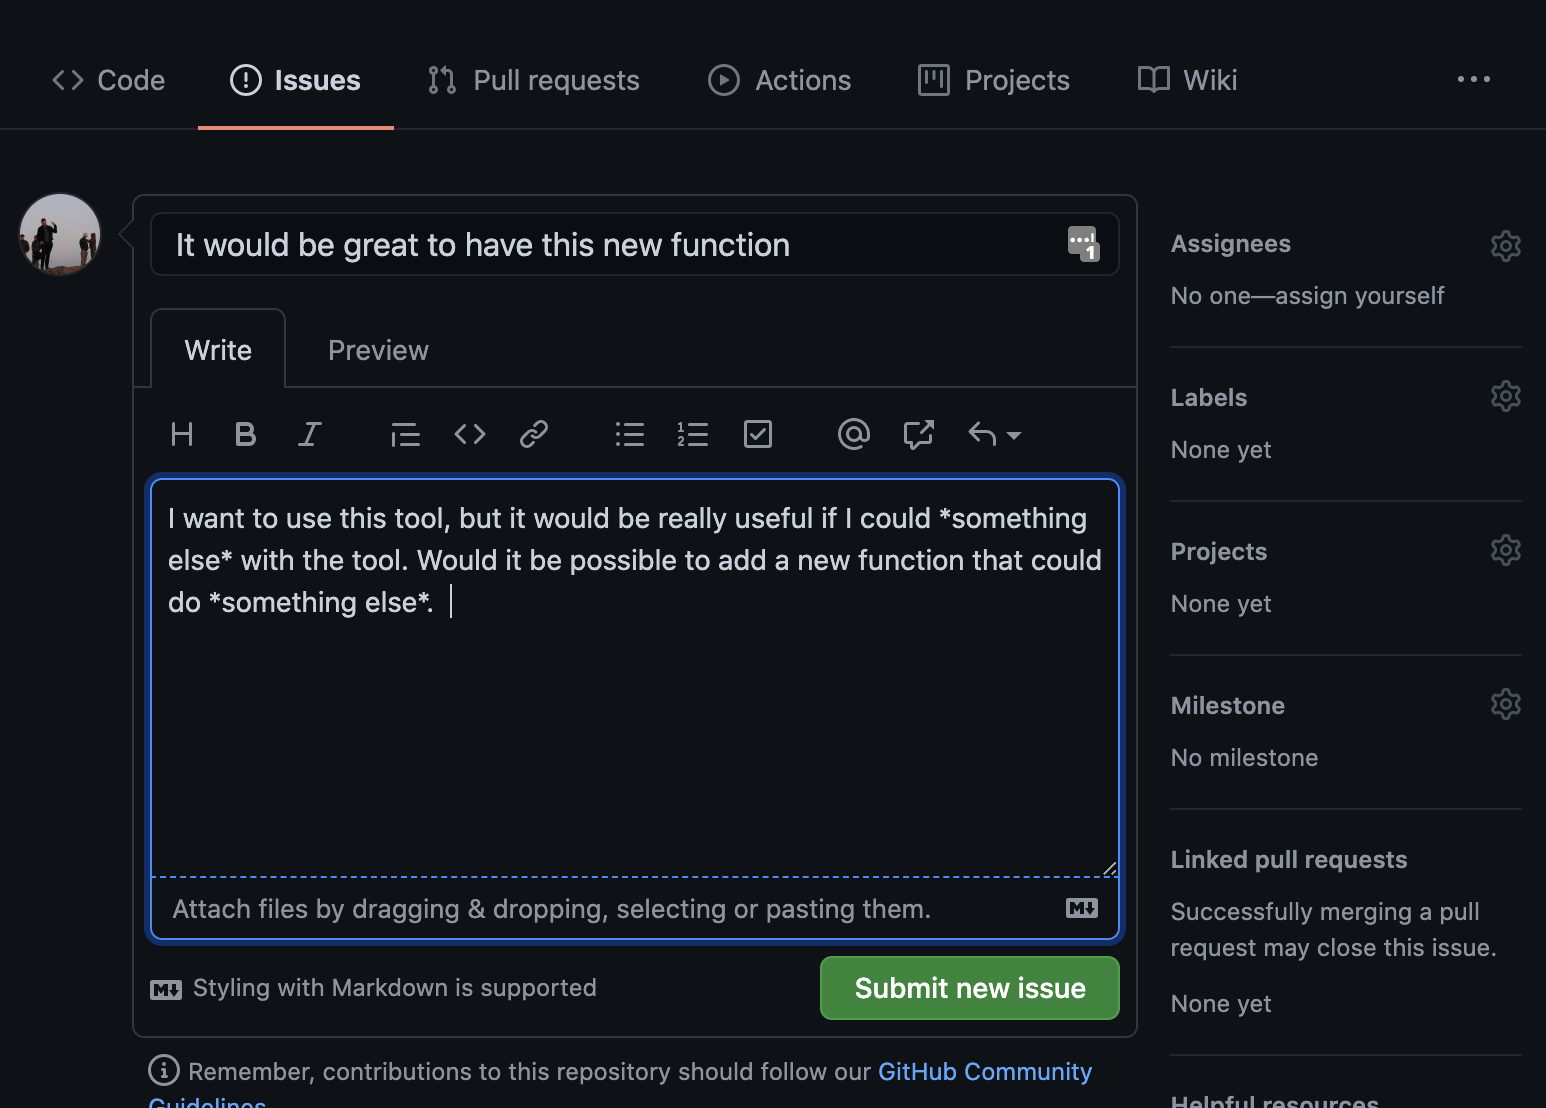 ] --- ## Branching If you are making modifications to a repository that is actively being used, you might still want to be able to maintain a working version, until the updates you make are finished tested * Building a new feature * Fixing a bug Creating a branch creates an additional copy of your repository, whose history can then diverge. Later on when you finish working on the branch, you can then integrate it back into the master branch. Master should reflect what is 'published'. This is your core repository. Branching helps protect the master. --- ## Branching .pull-left[ *Git* ``` sh git branch 'newbranch' # to build new one. ``` ``` sh git branch # tells you what branches exist ``` ``` ## * master ## newbranch ``` ] .pull-right[ *Rstudio*  ] --- ## Checkout - Branches Once you have made a branch and want to work on it, you will need to make this branch the one that is active in your Git. The checkout command allows you to switch what is active in your Git. .pull-left[ *Git* ``` sh git checkout newbranch ``` ``` ## Switched to branch 'newbranch' ``` ``` sh git branch ``` ``` ## master ## * newbranch ``` ] .pull-right[ *Rstudio*  ] --- ## Pull requests Git has the merge function to allow branches to be merged together. Pull requests are the GitHub equivalent, but have built in steps for review. This can be for you, or for others you are collaborating with. Pull requests are the cornerstone of a collaborative GitHub Environment. 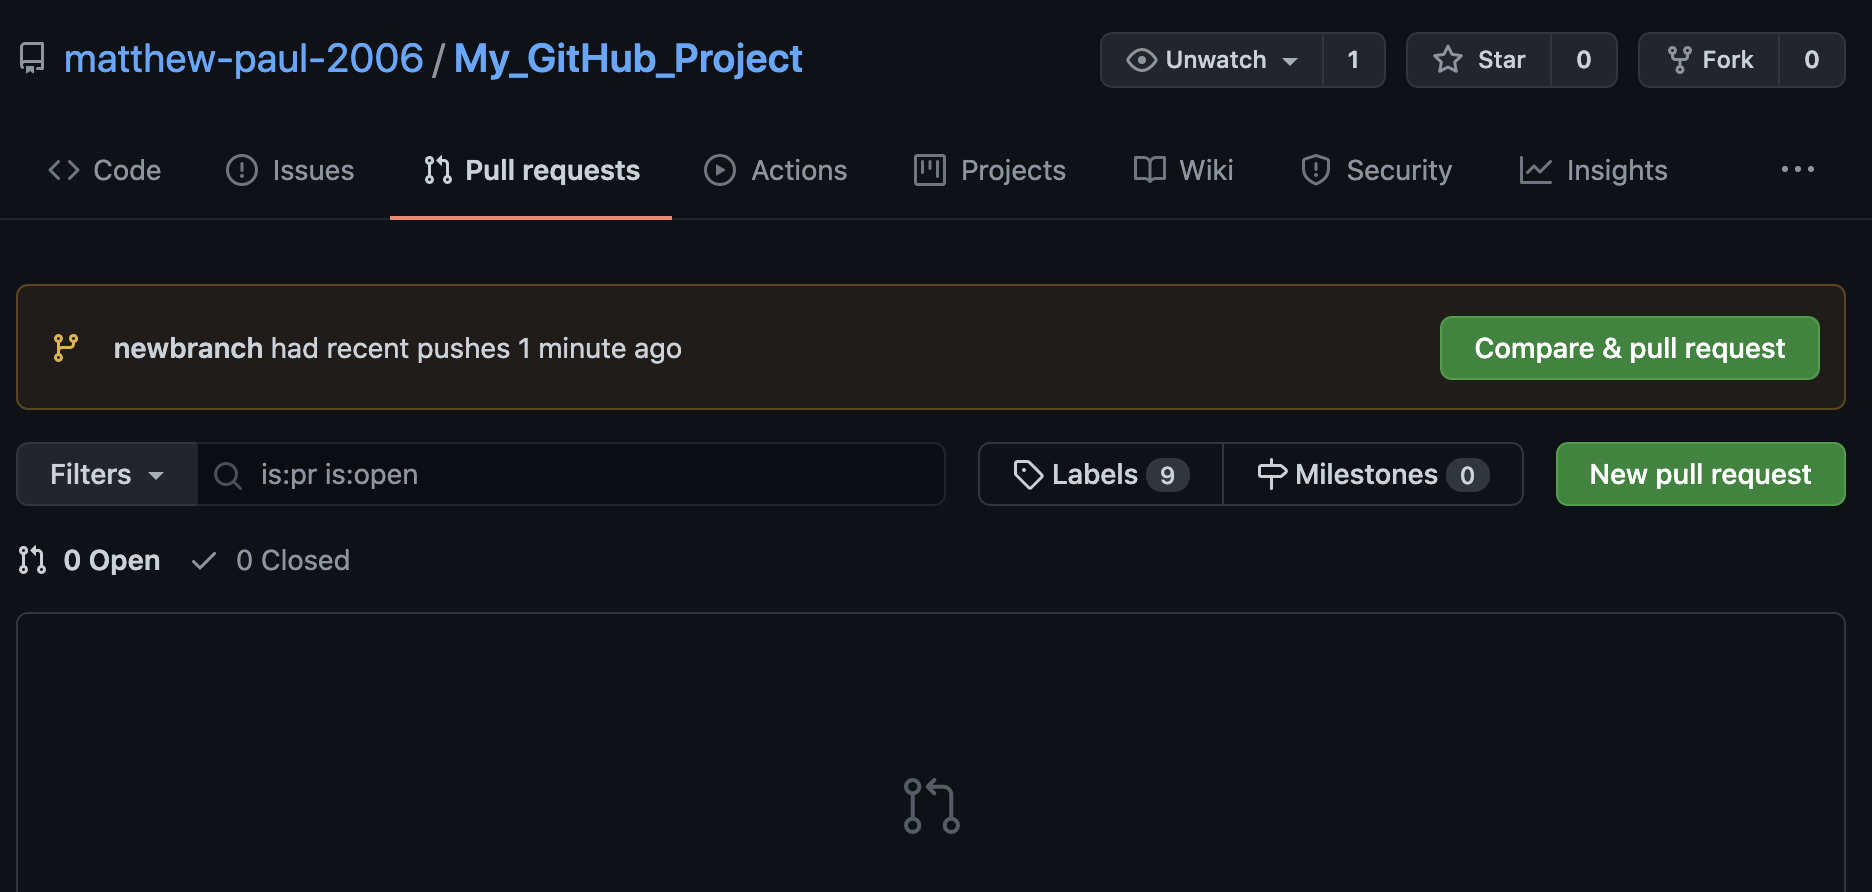 --- ## Pull requests When you start a new pull request, you first specify which branches you are bringing together, and what the directionality is.  --- ## Pull requests Next you add a comment to describe what this merge is doing. At this point you can also add reviewers. If you are working collaboratively this is asking a specific person to review the code and approve the pull request.  --- ## Pull requests Once the pull request is added other people can look at the request, including the reviewer, and add comments and feedback. If this addresses an issue you can use the # to tag it in the pull request. At this point GitHub will check that there are no conflicts ie. the branches can be merged succesfully.  --- ## Pull requests Once everyone is happy, you can merge the pull request. You will then get the option to delete the old branch.  --- ## Pull requests vs. git merge Generally it is good practice to do a pull request as opposed to a merge. Pull requests are preserved conversations, that include code. Even if something is not accepted, the rationale for why is saved. This means you have a record of the 'culture' surrounding the repository. Even working with your own private repository, where you are a core/only contributor pull requests are good to use. You can still follow the workflow: make an issue take a branch, address the issue, then pull. If nothing else it is good record keeping and good practice for when you do work on a collaborative project. --- ## Conflicts Occasionally you may get a conflict error, typically from a pull or a merge. This is because Git is unsure how to merge two files together. Maybe two collaborators have edited the same line of code and tried to merge them back into master branch. There will be an error message, and you can also see it displayed in status. To resolve the conflict you will have to open the problem file/s. --- ## Conflicts The conflicting code with information from both sides of the merge will be present in the problem file/s. Once you have opened the file and you will find the structure somewhere: <<<<<<< HEAD master code i.e. y=1 ======= branch code i.e. y=2 \>\>\>\>\>\>\> branch name To fix this, you just have to pick which code is appropriate. Delete anything superfluous including the "<, = and >". If the conflict is found on GitHub, it will walk you through this. v ## Forking How do I work on a project that belongs to someone else on GitHub? Fork it first. This is like the GitHub equivalent of branching. This will create a whole new copy in your GitHub. This gives you the opportunity to edit/add/remove files without any risk. 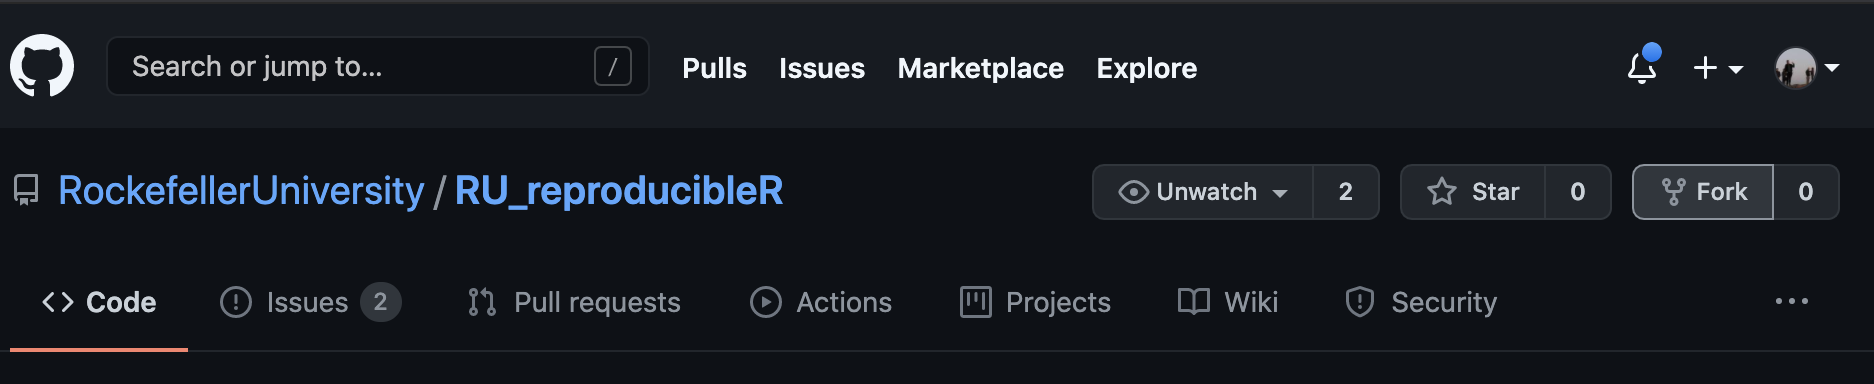 --- ## Forking Forking is a cornerstone of the open source nature of GitHub. You can fork any public repository. Adapt it to your needs and then deploy it in whatever analysis or tool you are working on. You should just check for a license first. Alternatively, when collaborating you can take a fork. This is often how bugs are fixed in public tools, as a user may find a way to fix it before the developer. The user can take a fork, fix the bug, create a pull request, then the developer can approve it for integration into the repository. --- ## .gitignore file Sometimes you have large or private files you do not want to upload to github. A .gitignore file contains any files or directories you want Git to ignore. You can use wild cards to exclude whole file types i.e. \*.bams, or \*.bw Typically a .gitignore will be in top level of the directory. You can also have additional .gitignores in sub-directories. These take precedent. You can use ! to allow something to be seen (i.e. if all log files blocked in parent directory, but allow a specific log file to be displayed in daughter directory)  --- ## Moving files If you move a file Git can get confused and treats it like you have deleted and created a file. This means the new file will not have the history. RStudios git interface figures it out if you stage the "deletion" and "creation" at the same time. If you move a file on the command line, there is a special Git move function: ``` sh git mv FilePath NewFilePath ``` The above helps with moving a single file. If you have a bunch of files to move, you can just move them in finder/explorer. Then post-hoc fix the staging to fix the move using: ``` sh git add -A . ``` --- ## Other useful commands to be aware of * **rm** - A simple command to remove files, but with parameters that help remove it from being tracked by git, or to remove the files entire git history. * **rebase** - A powerful alternative to marge. Perfect for when the master has updates that are not present in a branch. You can use rebase to update the branch, with the new master commits. * **reset** - Rewind back staging and commits * **checkout** - Though we covered checking out a branch, this can also be used to travel back to a specific commit in history or roll back unstaged changes to a specific file. Follow up with the [Git book](https://git-scm.com/book/en/v2) for more detail on implementing these commands. --- class: inverse, center, middle # Zenodo <html><div style='float:left'></div><hr color='#EB811B' size=1px width=720px></html> --- # Zenodo GitHub is a great resource, but there are risks with storing all your resources in a private enterprise. Zenodo was developed and funded by the European Commission (a key driver of the EU agenda), for the purpose of promoting and maintaining open science. --- # GitHub to Zenodo As most folks are using GitHub for collating code, Zenodo and GitHub have worked together to make adding a persistent identifier to you repository very easy. Let's have a [look](https://zenodo.org/records/10668666) --- # GitHub to Zenodo Simple series of [steps](https://docs.github.com/en/repositories/archiving-a-github-repository/referencing-and-citing-content): 1. Log into Zenodo using a GitHub login. 2. Authorize Zenodo to access GitHub. 3. Go to GitHub section of your [Zenodo settings](https://zenodo.org/account/settings/github/). 4. To the right of the name of the repository you want to archive, toggle the button to On. 5. Create a release for the GitHub repository. --- # GitHub to Zenodo After you have created a new release Zenodo will automatically then create a DOI. It also gives you a nice little badge, which you can add to your GitHub repository README. When this is done Zenodo will have stored a static version of the repository based on the release you created. This will be stored for the foreseeable future. --- # Figshare Figshare is similar to Zenodo. It is a private enterprise, but is free to individual scientists. There is a similar workflow to add a [figshare DOI](https://help.figshare.com/article/how-to-connect-figshare-with-your-github-account). --- ## Further Resouces * The [Git book](https://git-scm.com/book/en/v2) for all things git. * Understanding branch topology can be confusing. Git School have a nice [tool](http://git-school.github.io/visualizing-git/) to help you understand how the different branching, checkouts, commits, and merges map out with a graphic. * The [GitHub help page](https://docs.github.com/en) is put together really well and can help with both Git and GitHub questions. * Getting confident with the collaborative side of GitHub is tough. There are less serious repositories which you can take part in to practice i.e. [Dad Jokes](https://github.com/wesbos/dad-jokes). --- ## Git/Github and R In most of our training we talk about how great R is to do bioinformatics. With Git and GitHub this is no exception. I have shown you RStudio's user-friendly interface for Git. There are also R pacakges that allow you to do much of what we have talked about trhough R itself in a programmatic way: - [git2r](https://docs.ropensci.org/git2r/) and [gert](https://github.com/r-lib/gert): Git - [gh](https://github.com/r-lib/gh): GitHub --- ## Exercises Exercise on Git and GitHub in R can be found [here](../../exercises/exercises/GitandGitHub_exercise.html) --- ## Contact Any suggestions, comments, edits or questions (about content or the slides themselves) please reach out to our [GitHub](https://github.com/RockefellerUniversity/Reproducible_R/issues) and raise an issue. --- ## GitHub Desktop It is easy to add remote repositories from GitHub or local repositories from your computer.  --- ## GitHub Desktop We can check the log of the repository with the *history* tab.  --- ## GitHub Desktop Staging and committing is simplified: 1. Simply click the checkbox of all files you want to stage 2. Then add your commit message and press commit.  --- ## GitHub Desktop If there is an associated remote on GitHub you can then just push it up.  --- ## GitHub Desktop * For help setting up: https://docs.github.com/en/desktop * For help using the software: https://www.softwaretestinghelp.com/github-desktop-tutorial/